
Here's a tutorial =)
It was only 15 mins so its not very good.. but i'll fix it as i go along.. x
1) 1st things 1st, select your naked bimbo with a white background, you can do this by putting her naked in your home page [ not profile!]
Then go to the beauty shop and take a picture of her bald, so in photoshop you'll have your bald bimbo, then your bimbo with hair, cut off the bimbo's body on the "hair" bimbo.
So, now you have 2 layers, right click them and call them "Doll base" and "Hair".
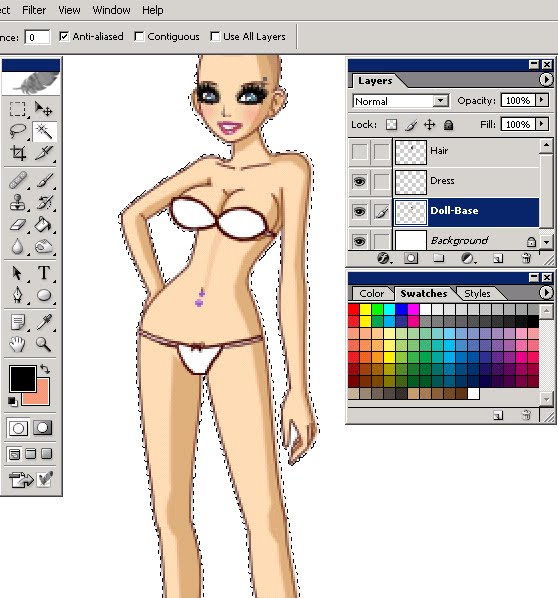
2) Create a new layer called "Dress" [ this is where the block colour of your dress will be]3) Go to the "Doll base" layer and select the Magic Wand Tool, Change the settings in the tool bar at the top to 90 and tick the anit-alised box ONLY. Click on the doll, it should fully select, if it doesn't change the 90 to 110

4)Now select the dress layer whilst the doll is highlighted, choose a colour you like with the opacity turned up on the brush [ i chose black but if you want to change the dress's colour it is best to slightly tint it a colour so my dress is black/red]. Fill in the doll completely [ you'll see why later]..
Once the doll is coloured in, unhighlight her and go to the box on the right, you'll see "opacity" Turn it down so you can see the lines on her body. usually anywhere from 40-80 is fine.

5) Now create a new layer and lable it, dress outline, i chose purple so you can see it more, but if your dress is red choose a dark red colour. If it is light blue choose dark blue ect...
Now select the "Pen tool" It looks like a fountain pen and go around the doll in the parts where you want the dress to be..
6) Once you've drawn your dress you'll get a grey line around the dress the lines must connect so you can move the pen away without creating more lines, now right click on the line and select "Stroke path" make sure the simulate pressure ISN'T highlighted.
[url=http://img231.imageshack.us/i/tutorial6l.png/][img]http://img231.imageshack.us/img231/3972/tutorial6l.png[/img][/url]
7) Now you've got your outline sorted you can go back to the "Dress" Layer and turn the opacity up, Go to your wand tool and go back to the outline highlight the outside of the dress and right click and click on "Select Inverse" then go back to your "Dress" Layer, now clcik the rubber tool and delete everything, you'll see that only the parts inside the dress stay, so you get your dress!
[url=http://img443.imageshack.us/i/tutorial7j.png/][img]http://img443.imageshack.us/img443/1631/tutorial7j.png[/img][/url]
8) Again, create a new layer call it " Shading" Now select the dress again and go back to your shading layer turn the opacity to 50% Mines set to 100, but i'll sort the shading as i go , so don't panic...
[url=http://img404.imageshack.us/i/tutorial8.png/][img]http://img404.imageshack.us/img404/3665/tutorial8.png[/img][/url]
9) Grab a colour maybe 4 shades lighter and colour in all the feature points, the top of the bust, the straight lines on the legs and the waist of the doll, blur them out once you've done it, if they are too strong turn the opacity on the layer down, if they are too weak turn it up..
[url=http://img94.imageshack.us/i/tutorial9o.png/][img]http://img94.imageshack.us/img94/5149/tutorial9o.png[/img][/url]
10) Grab the Blur tool, it looks like a tear drop, turn it up to 100% strength and blur out all of the shading layer to give it a smoother shading. If the shadings too weak you can turn it up remember! I always blur it out and then erase the colour under the bust, to make sure the lines are neat.
[url=http://img36.imageshack.us/i/tutorial10.png/][img]http://img36.imageshack.us/img36/5364/tutorial10.png[/img][/url]
11) Nearly done..
Now, go onto the "doll base" layer and click the eye next to it, this makes it invisible.
Now grab the highlighting tool, not the wand its called " Rectangular marquee tool.... highlight all the dress that you have, make sure all your layers apart from hair and doll are on show. now click edit, copy merged.
[url=http://img8.imageshack.us/i/tutorial11.png/][img]http://img8.imageshack.us/img8/8670/tutorial11.png[/img][/url]
12) After you've done this you'll have all of your dress merged together on one layer call it " Finished dress" , so you can delete everything excet the doll base, hair and finished dress layer.
[url=http://img171.imageshack.us/i/tutorial12.png/][img]http://img171.imageshack.us/img171/9662/tutorial12.png[/img][/url]
13) Duplicate your finished dress layer and name it 2, this way you can change the colour of your final dress..
[url=http://img99.imageshack.us/i/tutorial13.png/][img]http://img99.imageshack.us/img99/3278/tutorial13.png[/img][/url]
14) Image-Adjustments-Replace colour..
[url=http://img155.imageshack.us/img155/6884/tutorial14.png][img]http://img155.imageshack.us/img155/6884/tutorial14.png[/img][/url]
15)now you'll see three sliding bars, move them until you get the right colours you want to put your dress, your dress'll change to the colour, if the colour is too washed out, change the 'saturation'.. then click 'Ok"
[url=http://img529.imageshack.us/i/tutorial16.png/][img]http://img529.imageshack.us/img529/8545/tutorial16.png[/img][/url]
16) Bring back your doll base and your hair layers, here is your final product, use the rectangle marquee tool and select over all the layers you have, and copy it into a paint file and send it in! x
[url=http://img819.imageshack.us/i/tutorial17.png/][img]http://img819.imageshack.us/img819/9465/tutorial17.png[/img][/url]
de unde pot lua programuu ?
ReplyDelete